In this article I will give you a basic understanding how to do The design sprint and some personal experience running it.
The sprint is a five-day process for answering critical business questions through design, prototyping, and testing ideas with customers.
The Design Sprint is a rapid prototyping method originally orchestrated by Jake Knapp in Google Venture. It is used by many giants as Google, Slack, Spotify and startups alike. It is a set of activities to map, design, decide and test an idea in a short period of time to get feedback early. In most cases it is applied on some product ideas, but it can be applied on any kind of idea that would be used by others. It can be a physical product a software product or anything else.
I think the main advantage is that it is based on validated learning process. You come up with an idea you test it and you have a quickly validated idea. It saves time with not building something that no one wants. We often fall for our misconceptions about what we think is needed based on our experience, culture and influences. The reality can be really different. I’m really a strong proponent of experimentation and rapid prototyping. It is used today in many industries, form film making (Alien Queen “Garbage Bag Test”) to classical automotive.
Another advantage that it’s fun to do. The Design Sprint uses a lot of ideas from Design thinking, so it has an aspect of gamification. It’s lot more fun to do creative activities than to sit before a lengthy PowerPoint presentation and listen to a monologue. In fact research shows that by implementing gamification people tend be more open to give a deeper expression of what they really think and are more drawn in to the activities.
The third part that I like about it that it is quick. In only few days you can: design, decide and test an idea. You don’t need to play a never ending email ping-pong or to read hundreds of feedbacks forms. The ideas and decisions are coming fast during a period of concentrated work.
The down side is that it seems like a lot of time invested in to it. But I think, paradoxically, it saves so much more time you would spend on email ping-pongs, meetings, waiting for decisions, waiting till everyone has time, etc… It could be hard to find the right people that understands that the time investment is worth it, also to find people that are opened for various activities and interactions.

What would you need to start a design sprint
As mentioned, there are two most difficult parts to the Design Sprint and that is the time and personal you would need to have. This activity ideally needs five or two full working days of work. That could be a challenge and I advice to plan this really ahead of time if possible. It’s not good to do this in a rush. The results may be shallow. The second time I ran it was in time-stress and it was not so enjoyable and deep as I would liked it. It is also important to be fully concentrated, so no notebooks, phones or any other distractions (the hardest part for some :)).
You will need a team for this, so convince the participants that it is worth it. Show them the benefits. The ideal size of the team is supposedly 7. More brains, more ideas for solutions, but I did it with 6 and it was working, maybe I wont go less then 5.
For the team you will need:
- the facilitator – who understands how this should work
- the (final) decider – who would make decisions when the team ends in a deadlock
- the voice of the end user – team members that are really close to the end user segments
- the voice of the technical/development/producing subject matter expert – people who should be able to say what is technically possible (not to go totally crazy)
Selection of the team is important in the sense that they should be really be motivated and energetic individuals. The Design sprint is full of activities that needs energy. You definitely don’t want to work with team members who don’t want to participate or is tired. Also make sure that you explain everything in depth before you start the sprint.
In order to have the amount of time you sink in to it you should pick a problem that is worth it. Don’t choose a small challenge. You should go for something that is really meaningful and doable during this period of time. Just don’t go for a small win, or a nice-to-have project. You can frustrate the participants with it and they could not be so eager to participate the next time you organize it.
You will also need a suitable closed space with enough whiteboards, markers, pens, dots, post its, etc… or due to current state of the pandemic, you can do it digitally. I had the opportunity to do a fully digital Design Sprint and to be frank, it was not the best experience. People can be easily distracted, misunderstandings can happen more often, etc…
As normal in agile environments, also here: use timeboxes. It helps to create focus and feeling of urgency. Also the best ideas are usually the first ones. Make sure you have regular breaks, choose a good time for lunch, have enough refreshments and avoid lunch crowds.
Activities during the Design Sprint days
There are two versions of the Design Sprint. One shorter and the other, probably because the time pressure aspect, a shorter one. Both are basically same. The first version is a five day full work week sprint and the second is a four day sprint, but just the first two days are necessary for the whole team. Here is a short overview what is done when:
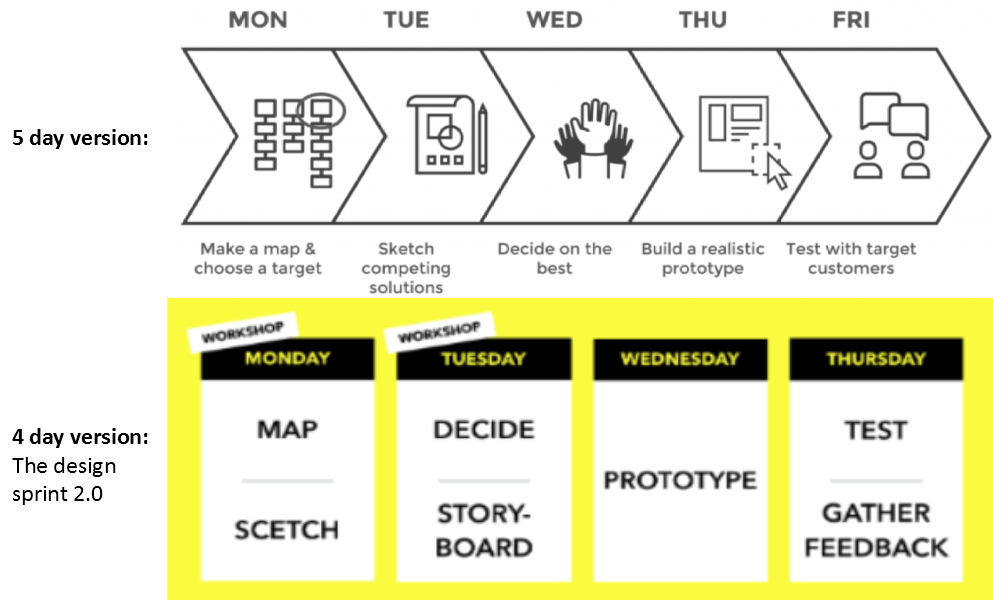
The order of the activities should be sequential as they follow up on each other results. The days when to do them can be basically as you want it is more about phases then specific days. It could break the immersion if you break the streak with some free day, but really the best is to have it concentrated. Here are the key phases:
Mapping the problem & choosing a target:
The first thing is to map your problem you try to solve. Take to your discussion (potential) end-users, subject matter experts and anyone who can give you a wider context of the problem.
There are some activities to try out to help creative thinking.
How Might We…solve a problem (HMW). is an activity known for a long time and it should help to formulate a problem. Examples: How might we make the UI experience a delight?, How might we make the testing process simple?,… Each person writes his HMW on a sticky note and add HMW to the corner. Then try to prioritize the HMW and vote what to pick.
Another activity to stimulate creativity is to do Lighting demos. Try to show examples of other solutions, other products, tools, even from other industries and domains. Most probably you are not the first team to try solving the same or similar problem. Try to think if you have already seen some solution for the problem. You can research the internet, make screenshots, etc… After everyone gather information about how others solve the problem try to do a small 5-minute demos of your favorite solutions.
Another activity is to imagine that the product/solution is a disaster. Imagine one year went by and it was a total failure. Ask question what went wrong in regards of the project/problem/solution mission/vision? Every member should do this in the first round separately and then one by one present the disasters. You can now see what are the biggest fears, risks of the client and the team. Now you can prioritize them and have them on mind when designing a solution. For me as a PO it gave me a good basis for a risk analysis.
After the activities you can have enough material to try to visualize the problem. You can use various methods of visualizations: user story mapping, user journey map, mind map, photos, physical objects, anything that helps the team to really understand what is the problem you try to solve. Mention user actions, roles, environments and end to end engagement. Try to keep the map simple and readable.
In my case I always do a User story mapping. I map the Minimal Viable Product or the walking skeleton of the product or feature. After this is done we have a good look on all of the user stories and decide what is manageable to do. So far I had no problem with selecting a too small or too big of an issue.
After you map the problem, you need to decide what part of the map you will try to solve. It’s hard to say how big of a problem/product/feature it should be. It should be challenging, so there i s a point to do it, but it should not be too abstract or large.
Sketching
The whole idea of the sketching phase is to prepare and present competing ideas. At the end of the phase there should be different proposals to solve the problem. The sketching comes in four steps:
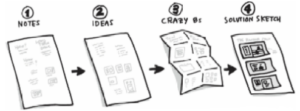
- Boot up – 20 min preparation – collect your inspirations, go around the room and make notes – check the goal, check the lightening demos, write down any thing that could be useful
- Rough solutions – 20 min – Doodle for 20 minutes what you think is the best solution
- Rapid variations – Crazy 8’s – 8 minutes – The idea is to search for alternative solutions of what you already thought of. It is meant to literally to push yourself what other solutions there could be. It should be 8 variations of the same idea. Think about “What would be another good way to do this?”. Take a paper and divide it on 8 parts. Invest just 1 min per section to doodle the alternative solutions. Don’t worry this will not be shared with the team. After the time is up and think for a while which solution you like the most.
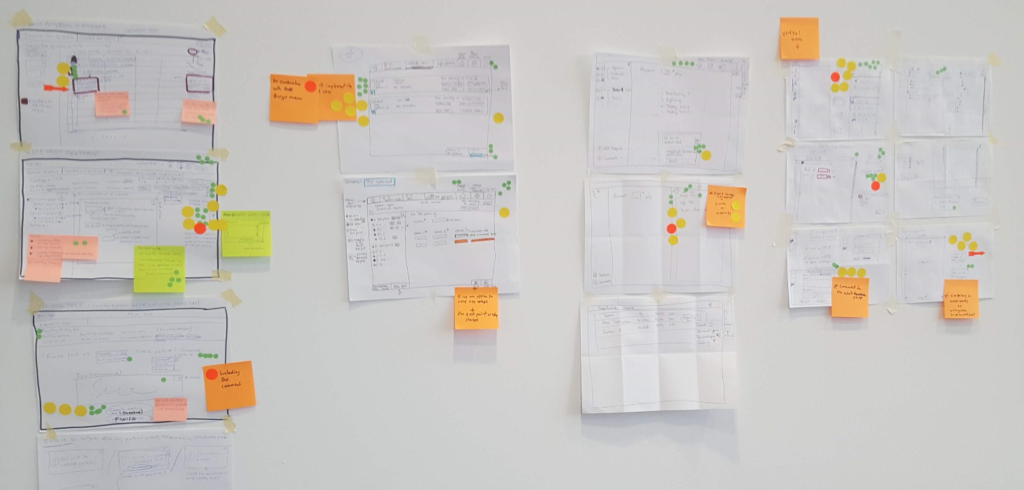
Now you should have a rough idea of how the solution should ideally look like. If ready every team member should take their best ideas and sketch a detailed solution in 30 mins. The sketch should be self-explanatory. Use titles, descriptions, arrows, symbols, etc… as the next step would be to view them without any comments. Everyone should have the same paper, same pen. Ideally you should try to be anonymous, so no one know which sketch was done by whom. The facilitator needs to shuffle the sketches or somehow anonymize it. For the form just remember: ugly is OK. It can be ugly, but descriptive enough to understand what could you see. You should write real texts not just “Lorem ipsum”s, so it is understandable what is happening. When the sketches are ready, hang them on the wall as in an art museum. The team can now view them, but without any comments, questions or even emotions 🙂 Just a silent observation of the sketches.
Deciding
At first the team indicates what they think is are the best ideas by placing votes on various ideas. Each team member has a limited number of votes (3,5,8…) and they can place it on whatever they like. This voting process is silent and should take just a short amount of time 10 mins. This shows the team a heat map of what the team is actually leaning toward. Again this is a silent activity, so you don’t want to argue or persuade other to vote for something. Just go around the sketches silently and place your votes. To do this efficiently you have to have sketches that are understandable and described. There can be votes for just some parts of the sketches e.g. the way how certain user interaction is done or how some element is placed. The team members place more dots on ideas that you think are more exciting. If something is unclear, take a note and place it below the area you have questions about. Move through each sketch.

Story boarding
Prototyping
Testing
Processing the results and next steps
After you have all the interviews done, collect your notes, recordings and meet with the team. Discuss your findings. You can come to a conclusion that the product would be a disaster and you have just saved a lot of time and money with not building that nobody wants. Alternatively you can find out that everything went well and now you have a very good basis to start the development. You could also find out that some elements of the product are confusing or not needed at all. You can throw out the not needed parts and continue on. The parts that were not understood you can now redesign. Change the prototype and do another round of interviews. In either case you have gained a lot of value in a short time. You could test out your hypothesis with real end users and you can be confident in further steps. You have good arguments to progress with the product. You have gained a good understanding of the product within the team and now the whole team knows what it will be about and what can be their expectation. Also you reached team consensus of how the product should work.
Final words
The result of our interview was that we avoided to implement a completely unnecessary feature, we got suggestions on additional upgrades, we discovered a previously unknown constrain and found out that the user had problems with terminology used in the product. But to sum up our case: the tested prototype really helped us to kick off the product. We had a ton of materials to which I was returning back for a long time. It gave the whole team a clear vision. The previous team that were trying to build the same product, but after a long time of building the product they found out that it has horrible UX and the company dumped the project. With a richly developed prototype we built I’m sure I spared a ton of emails and meetings to define how it should work. With having a lot of ideas discussed already upfront we could aim on complex technical questions. Some of my team members were sceptic when travelling to another country for this activity (to do the Design Sprint in person), but after we where finished the value of it was acknowledged.
As with all methods you need to evaluate when to use what approach. This about how to use strong aspects of the aspect and keep in mind the weak points and try to mitigate them.